
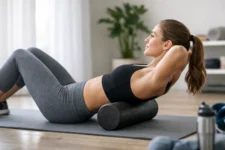
A foam roller for lower back pain can feel like a smart recovery shortcut after a long desk day, a hard leg session, or hours behind the wheel. But there is a key distinction that can save you from making soreness worse: the best results usually come from rolling the tight muscles around your low back, not aggressively grinding directly on the lumbar spine.
Your lower back is not designed to flatten over a hard cylinder. It has a natural curve, delicate joints, and nerves that do not respond well to excessive pressure. Used with control, though, a foam roller can help reduce stiffness in nearby tissues, improve how you move, and make your warm-up or recovery routine feel far more productive.
Why your lower back may feel tight
Lower-back discomfort is rarely only a lower-back problem. Tight hip flexors from sitting, overworked glutes from training, restricted upper-back movement, and fatigued hamstrings can all change how your pelvis and spine handle movement. When those supporting areas are not pulling their weight, your low back often tries to compensate.
That is why a quick roll through your glutes and hips may feel more helpful than rolling the painful spot itself. Think of it as restoring better options for your body to move. A roller cannot diagnose or cure the source of pain, but it can be a practical recovery tool when muscle tension and everyday stiffness are part of the picture.
If your discomfort began after deadlifts, squats, a long run, or a weekend of yard work, start by looking at the muscles that support your hips and trunk. You may find the relief you want without putting direct pressure on your spine.
How to use a foam roller for lower back pain safely
The rule is simple: roll the supporting muscles, move slowly, and keep pressure tolerable. Mild discomfort in a tight muscle can be normal. Sharp pain, tingling, numbness, burning, or pain that travels down your leg is a stop signal.
Use each pass as an assessment rather than a test of toughness. If you brace your breath, tense your shoulders, or wince through every inch, the roller is too firm, the pressure is too high, or the area is not ready for direct rolling.
Start with the glutes
Sit on the roller with one hand behind you for support. Shift slightly onto one side of your glute, then slowly roll from the top of the pelvis to the upper thigh. To focus on a smaller area, cross the ankle of the working side over the opposite knee, but only if that position feels comfortable in your hip.
Spend 30 to 60 seconds per side. Pause on a tender spot for a few slow breaths rather than rapidly rolling back and forth. Your goal is to let the muscle relax, not to force it into submission.
Give your hip flexors and outer hips attention
Hip flexors can tighten after long periods of sitting, while the muscles along the outside of the hip can become overloaded by running, walking, squatting, and single-leg training. A foam roller can work well on the front and side of the upper thigh, using your arms and opposite leg to control how much body weight you apply.
Avoid camping out directly on the bony point of the hip. Roll the surrounding muscle tissue instead. If the outside of your thigh feels intensely painful, lighten the pressure or switch to a softer roller. More pressure is not automatically better recovery.
Roll the upper back, not the low-back curve
A stiff upper back can make the lower back do extra work during overhead presses, rows, rotation, and even daily reaching. Lie with the roller across your mid-back, support your head lightly, and roll from the bottom of your rib cage to the top of your shoulder blades.
Keep your ribs from flaring and avoid rolling into the neck. A few controlled passes can help you feel less locked up before training, especially if you spend much of the day seated.
Use gentle hamstring work when it helps
Tight hamstrings are not always the cause of lower-back pain, but they can limit comfortable hip movement. Sit with the roller under one hamstring and use your hands to lift your hips slightly. Roll from just above the knee toward the glute, avoiding the back of the knee itself.
Keep the range small and controlled. If you have nerve-like symptoms, such as tingling into the calf or foot, skip hamstring rolling and get professional guidance.
Choose the right roller for your recovery routine
The roller you choose changes the experience. A high-density roller provides firmer pressure and tends to last longer, making it a strong pick for experienced lifters and regular recovery work. It can also be too intense for someone who is new to self-massage or already dealing with a sensitive back.
A medium-density foam roller is often the best starting point for most home-gym setups. It offers enough structure for glutes, quads, and upper-back work without turning every session into a grit-your-teeth challenge. A textured roller can create more targeted pressure, but the raised pattern is not necessary for results.
For very tender areas or beginners, a softer roller is a better first move. You can always increase pressure later by using a firmer tool, crossing a leg, or shifting more body weight onto the roller. Starting too aggressively is one of the fastest ways to abandon a recovery habit that could otherwise help.
FitwellGoods shoppers building a practical recovery station can pair a roller with a yoga mat, resistance bands, and a mobility routine that fits beside strength and cardio training. Small tools earn their space when you use them consistently.
A 7-minute lower-back support routine
Use this sequence after training or at the end of a long day. Keep every movement calm and pain-free.
- Roll each glute for 45 seconds, using slow passes and a brief pause on tight spots.
- Roll the front and outer upper thigh for 45 seconds per side, keeping pressure moderate.
- Roll the upper back for 60 seconds, staying between the lower ribs and shoulder blades.
- Finish with six to eight glute bridges, then hold a gentle hip-flexor stretch for 20 to 30 seconds per side.
The bridges and stretch matter because rolling alone is not a complete solution. After relaxing tight tissue, give your body a simple movement pattern to practice. That may help you carry the temporary feeling of looseness into walking, lifting, and daily posture.
When foam rolling is not the right answer
Do not use a roller as a way to push through serious or unexplained back pain. Seek medical evaluation promptly if you have pain after a significant fall or accident, fever, unexplained weight loss, bowel or bladder changes, progressive leg weakness, numbness around the groin, or pain that is severe and worsening.
You should also be cautious with diagnosed spinal conditions, osteoporosis, recent surgery, blood-clot concerns, or inflammatory flare-ups. In these cases, a clinician or physical therapist can help you determine what type of movement is appropriate. A foam roller is a fitness accessory, not a replacement for individualized care.
For pain that lingers beyond a couple of weeks, repeatedly interrupts sleep, or keeps returning every time you train, look beyond recovery tools. Review your lifting technique, training volume, sleep, work setup, footwear, and stress levels. Sometimes the most effective fix is not another mobility drill but a lighter training week, stronger glutes and core, or a professional assessment.
Make recovery work for your actual routine
The best foam rolling plan is the one you will use. Two focused minutes before your workout may be more useful than a complicated 30-minute session you skip. Try rolling your glutes and upper back before lower-body training, then use a softer, slower session after long workdays when stiffness is highest.
Pay attention to what changes. If your squat feels smoother, your hips move more freely, or you get up from your desk with less stiffness, keep that routine. If a technique consistently aggravates symptoms, remove it. Recovery should help you train with more confidence, not leave you sore in new places.
Treat your foam roller as one useful piece of the bigger picture: smart training, purposeful movement, quality sleep, and enough recovery to show up strong again tomorrow.







&url=https://fitwellgoods.com/shop/speed-agility/sports-agility-ladders/juvale-agility-ladder-workout-equipment-with-6-speed-training-cones-and-resistance-parachute-footwork-skills-drill-gear-for-football-and-soccer-20-ft/&media=https://m.media-amazon.com/images/I/41nTC1sWrAL._SS1024_.jpg)


%20|%20Non-Slip%20Moistureproof%20Yoga%20Block%20Sleeve%20|%20Eco-Friendly%20&%20Washable%20|%20Durable%20&%20Supportive%20|%20Blocks%20Not%20Included&url=https://fitwellgoods.com/shop/yoga/yoga-blocks/silicone-protective-cover-for-yoga-blocks-9x6x3-4-foam-cork-blocks-non-slip-moistureproof-yoga-block-sleeve-eco-friendly-washable-durable-supportive-blocks-not-included/&media=https://m.media-amazon.com/images/I/31mv6hQbRFL._SS1024_.jpg)
&url=https://fitwellgoods.com/shop/yoga/meditation-benches/meditation-bench-bamboo-meditation-stool-folding-kneeling-meditation-bench-seiza-prayer-bench-prayer-bench-with-meditation-cushion-kneeling-stool-green/&media=https://m.media-amazon.com/images/I/41svjuo2VIL._SS1024_.jpg)


