Your legs feel like concrete, your next workout is already on the calendar, and you are doing the math: stretch now, skip later, hope for the best. This is exactly where a foam roller earns its keep – not as a magic fix, but as a fast, repeatable way to feel looser and move better when training is stacking up.
A foam roller for muscle recovery works best when you treat it like a tool with a purpose, not a punishment device. The goal is to calm down that tight, protective tone your body builds after hard sessions, improve how you tolerate movement the next day, and keep you consistent. Consistency is what changes your physique, your strength numbers, and your energy – not one heroic rolling session that leaves bruises.
What a foam roller really does (and what it does not)
Foam rolling is self-myofascial release: you apply pressure to muscle and surrounding tissues, then move slowly to create a short-term change in how that area feels and glides. For most people, the biggest payoff is improved range of motion and a noticeable drop in perceived soreness or “stiffness” for a few hours.
What it does not do is “break up toxins” or permanently smash knots into submission. That knotty feeling is often a mix of tension, sensitivity, and protective guarding. Rolling helps by changing input to your nervous system and by getting fluid moving through tissue. It can be a smart add-on, but it is not a replacement for sleep, smart programming, hydration, and enough calories and protein to rebuild.
When to use a foam roller for muscle recovery
Timing matters because the same tool can support different goals.
After training: downshift and reduce next-day stiffness
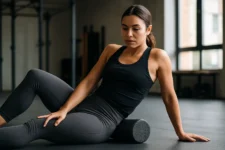
Post-workout rolling is great when you finish a strength day with heavy eccentrics (think squats, lunges, RDLs) or you just hammered intervals. Keep it short. You are not trying to “fix” everything – you are telling your body it is safe to relax.
Aim for 5-10 minutes after training, focusing on the areas you just loaded. Pair it with slow nasal breathing. You are trying to shift out of that high-alert mode.
On rest days: restore motion and stay ready
This is the sweet spot for most busy lifters and home-gym athletes. A quick rolling session on a rest day can make you feel like you did something productive without adding fatigue. It is also a great time to work on stubborn tight spots because you are not rushing to start a workout.
Before training: keep it targeted and light
If you roll aggressively right before lifting, you can sometimes feel a little “mushy” or less springy. Instead, do 30-60 seconds per area, moderate pressure, then follow with movement that uses that new range. For example, roll quads lightly, then do bodyweight squats or lunges.
The pressure rule that saves your recovery
If you are gritting your teeth, holding your breath, and turning red, you are probably doing too much. Pain is not the scoreboard.
Use a 1-10 discomfort scale and stay around a 5-7. You want “intense but controllable.” If you jump to 9-10, your body often fights back by tightening more, and you end up sorer.
A simple upgrade is to move slower, not harder. Slow rolling gives your nervous system time to adapt. Fast rolling often just irritates sensitive spots.
A practical rolling method you can repeat in 10 minutes
You do not need a complicated routine. You need one you will actually do when you are tired.
Step 1: Sweep the muscle, then pause on tender spots
Start with slow passes along the length of the muscle for 20-30 seconds. When you find a tender area, pause and breathe for 15-30 seconds. Then move on.
Step 2: Use small movement, not long aggressive rolls
Think 2-4 inches of travel around the tender spot. This keeps pressure where it matters.
Step 3: Finish with one movement that uses the new range
After rolling, do something simple: glute bridges, bodyweight squats, hip airplanes supported on a wall, or calf raises. This tells your body, “Keep this range. We use it.”
The best areas to roll for common training weeks
Most people do not need full-body rolling every time. Hit what is most likely to limit your next session.
Quads and hip flexor area: for squat days and lots of sitting
Quad tightness can make your knees and hips feel cranky and can pull you into a stiff, upright stride when you run. Roll the front of the thigh, then spend a little time on the outer quad. Avoid jamming hard directly into the front of your hip joint – stay on muscle.
Glutes: for deadlifts, running, and low-back “tightness”
Glutes respond well to pressure. Cross one ankle over the opposite knee to open the hip and find the meaty spots. If your low back always feels tight, glutes are a smarter target than smashing your spine on a roller.
Hamstrings: for hinge work and sprinting
Hamstrings can be sensitive. Start lighter than you think, and slow down. If you get nerve-like zings, ease off and change angle.
Calves: for runners and anyone with ankle stiffness
Tight calves can wreck your squat depth and make walking downstairs feel rough after high-volume training. Roll one calf at a time so you can control pressure. Try pointing and flexing the ankle while you hold a tender spot.
Upper back (thoracic area): for desk posture and pressing
This is more mobility than soreness relief. Place the roller mid-back, support your head with your hands, and gently extend over it. Skip the low back – it is not built for direct pressure like that.
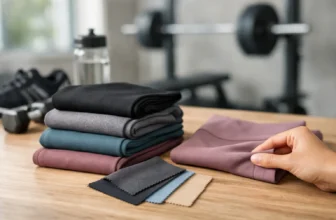
Choosing the right roller: smooth, textured, soft, or firm
Buying the wrong roller is the fastest way to stop using it. The best pick depends on how sensitive you are and how hard you train.
A softer roller is ideal if you are new, you bruise easily, or you want something you will use daily without dreading it. It is also great for calves and quads when you are already sore.
A firm, high-density roller gives deeper pressure and tends to last longer, which matters if you roll often and you are not lightweight. If you lift heavy and you like strong input, this is usually the best all-around option.
Textured rollers can feel more intense, but intensity is not automatically better. They can be great for experienced users who want more targeted sensation, but if you find yourself tensing up, you will get less benefit. For many people, smooth and firm is the sweet spot.
Size matters too. A full-length roller is easiest for back work and beginners. A shorter roller is more travel-friendly and easier to position on smaller areas, but it is less stable.
Trade-offs and “it depends” situations
Foam rolling is not always the right move.
If you have a fresh strain, sharp pain, significant swelling, or unexplained bruising, skip rolling that area. If you have numbness, tingling, or pain that shoots down an arm or leg, do not try to “roll it out.” That is a sign to adjust training and get a qualified opinion.
If you are doing a high-performance session where you need maximum stiffness and power output, keep pre-work rolling light and brief. Use it more like a primer, not a deep tissue session.
And if your soreness is coming from doing too much too soon, rolling will not outsmart bad programming. It can make you feel better, but it cannot negotiate with biology.
Make recovery feel like a stack, not a chore
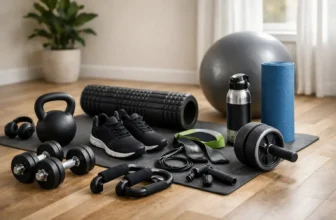
The easiest way to get more out of foam rolling is to pair it with something you are already doing.
Roll for 5 minutes while your coffee brews. Roll calves and glutes while you watch a show. Roll quads after a shower when your tissues are warm. This is how recovery tools become habits.
If you want that deal-forward, cart-building approach to training – the kind where you cover the basics in one place – a foam roller fits perfectly alongside simple recovery staples like electrolytes, protein, and mobility tools. You can browse rollers and other recovery picks at FitwellGoods when you are ready to upgrade your setup.
A simple 7-day use plan for real life
If your week is a mix of lifting, cardio, and long workdays, this rhythm works.
On lift days, do 5-8 minutes after training: quads, glutes, hamstrings, then one movement like glute bridges or squats. On cardio days, focus on calves and quads after: slow pressure, no ego. On rest days, do a 10-minute “maintenance” session that includes upper back mobility plus the tightest lower-body area.
If you are consistently sore in the same spot, take that as useful feedback. Sometimes it is technique, sometimes it is volume, sometimes it is sleep. Rolling can keep you moving while you fix the actual cause.
The small cue that makes foam rolling work better
Exhale longer than you inhale. That one change reduces bracing and lets pressure sink in without a fight. If you can breathe normally, you are at the right intensity.
Your foam roller is not a test of toughness. It is a way to show up tomorrow feeling more capable than you would otherwise. Use it like a pro would: short, consistent sessions that support the work you are already doing – and then go earn the next rep.
Closing thought: the best recovery plan is the one that keeps you training next week, not just the one that feels intense today.


&url=https://fitwellgoods.com/shop/activewear/mens-activewear/mens-track-jackets/puma-mens-track-jacket-graylarge/&media=https://m.media-amazon.com/images/I/41Yxq5eNZ5L._SS1024_.jpg)
,%20Portable%20and%20Lightweight,%205.3%20in,%20180g,%20Purple&url=https://fitwellgoods.com/shop/yoga/meditation-benches/ippinka-foldable-meditation-kneeling-bench-seiza-portable-and-lightweight-5-3-in-180g-purple/&media=https://m.media-amazon.com/images/I/21jrUBIWyRL._SS1024_.jpg)